Programming an Arduino UNO is pretty easy – just open the Arduino IDE, load sketch, upload and done. But when experimenting or working with larger code, you may find that your program doesn’t work as intended.
And how do you solve that? The regular way is to check the program line by line and see if you find any bug, or maybe use Serial.print(); to know what the device is doing at a specific moment.
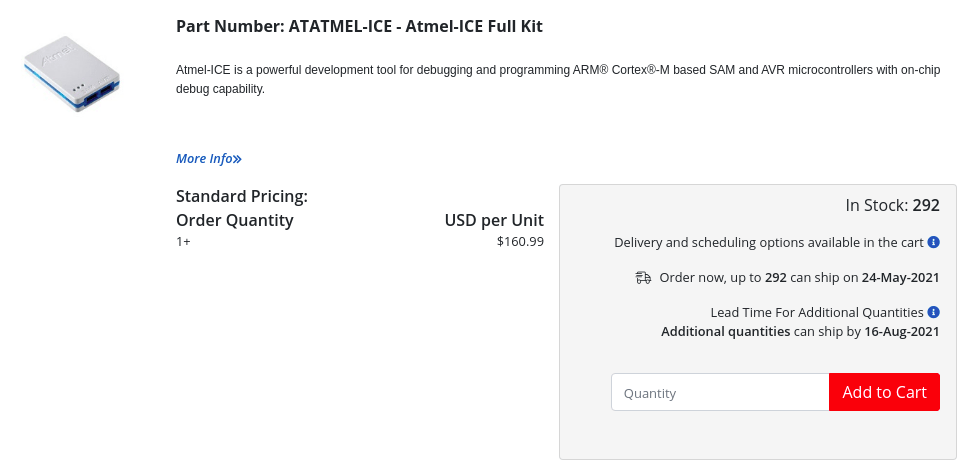
However, the professional way is to debug that program (execute it line by line with real time variable analysis, disassembly, etc.). To do that, you normally need a tool called debugger, like the Atmel-ICE. The problem is that they aren’t very cheap, as you can see in the following picture:
And even if you buy it, it is a mess to set it up and working for an Arduino UNO. You’ll need to a cut a small soldered section called ‘RST EN’ to disable the reset capacitor and then set the DWEN fuse correctly, and much more.
However, there is a solution for that – you can debug an Arduino UNO board (and similar ones) without an external debugger and hardware setup/modifications.
Firstly, you’ll need to have Visual Studio Code installed. Then you need to install an extension called ‘PlatformIO’ (this enables support for MCUs on Visual Studio Code. Link to its website). After restarting VS code, you’ll find a new home icon on the bottom bar. Click on it.

Then click on ‘New Project’ and configure it for your needs. When configured, open the platformio.ini file (if it’s not automatically opened) and add the following lines at the bottom of it:
debug_port = YOUR_ARDUINO_PORT

lib_deps = jdolinay/avr-debuggerCode language: JavaScript (javascript)
(Obviously, change YOUR_ARDUINO_PORT with the port (COM*, /dev/tty*, etc.) in which your Arduino is connected)
Then, open src/main.cpp file and write (or copy) the desired code. For example, I’ve made an easy blink sketch:
#include <Arduino.h>

void setup()
{
  pinMode(LED_BUILTIN, OUTPUT);
}

void loop()
{
  digitalWrite(LED_BUILTIN, HIGH);
  delay(500);
  digitalWrite(LED_BUILTIN, LOW);
  delay(500);
}
Code language: Arduino (arduino)
After that, you will need to add the following line:
#include <avr_debugger.h>Code language: Arduino (arduino)below the #include <Arduino.h> one. Many tutorials say that you need to include avr8-stub.h instead, but there are some useful definitions in the avr_debugger.h header that the other one doesn’t have. However, if you want to use Serial functions, such as Serial.print(); you must include avr8-stub.h instead.
Then, at the beginning of the setup() function, write:
#ifdef __DEBUG__
  dbg_start(); // use debug_init(); if you are using avr8-stub.h
#endifCode language: Arduino (arduino)
The #ifdef __DEBUG__ and #endif lines are optional, but those make that the code that enables debugging and blocks the normal execution is only run when debugging the sketch.
After adding those lines, the sketch should look like this:
#include <Arduino.h>
#include <avr_debugger.h>

void setup()
{
#ifdef __DEBUG__
  dbg_start();
#endif
  pinMode(LED_BUILTIN, OUTPUT);
}

void loop()
{
  digitalWrite(LED_BUILTIN, HIGH);
  delay(500);
  digitalWrite(LED_BUILTIN, LOW);
  delay(500);
}
Code language: Arduino (arduino)
After that, open the ‘Debug’ section (on the left) and click on the ⏵ icon. Wait a few seconds and the debugging session sould begin.
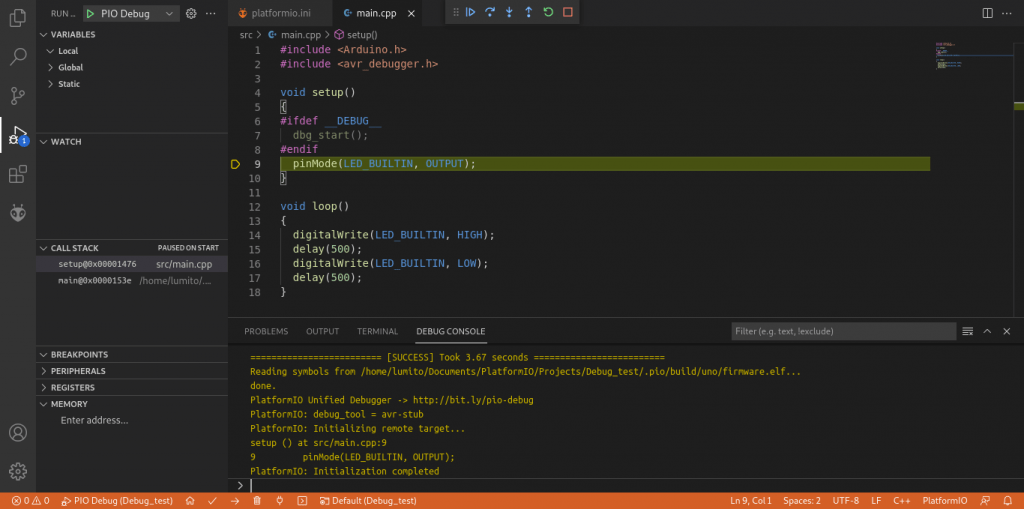
And… you’re done! Use the controls on the upper part of the window to debug:


You can set/remove breakpoints by clicking on the left of the line numbers.
On the left side of the screen (on the debug section) you can control the variables, look for a specific memory address, etc. And you can use the bottom terminal to run a specific command (on GDB).
And that’s pretty much all for this tutorial. If you like it, please share it with anyone who may be interested in this kind of things. Thanks!
Useful links: